After a long hibernation here is a new guide that will help all those who, for fun or profit, they want to retrieve the user / ATA master password which, when activated, protect (but not too much) disk access.
There tedierò with a disclaimer page. But do not try to look if you feel it stinks or precious photos of your wedding have been replaced by zeros page.
CREDITS:
This guide was created from information found on this found the forum thread HDDGURU
Requirements:
Hardware
- A computer disk drive, 3.5 "(the hardest thing to find)
- A floppy disk on which to install the software
- the hard drive to unlock.
- MHDD see version 4.5 in self extract floppy image can be found here
- file MHDD.zip modified scripts for WD hddguru taken from the forum: Mhdd.zip
- Victoria The software, available on Hiren's Boot CD
According to the ATA specification, published by t13.org whose last revision and available in pdf format here , passwords are stored in HPA (Host Protected Area). This part of the disc contains some (or all, depending on manufacturer) and disk firmware is protected from access. The operating system is not able to see this because the BIOS, that mediates access to the disk, protecting it.
But the exact point where to get the password within the HPA depends on the manufacturer. The following procedure is to retrieve the necessary information for the above-mentioned WD Scorpio and most likely for different models from Western Digital. Other manufacturers write password in different areas and contain the scripts used to offset the WD.
proceed with the release ...
We start by preparing a floppy disk with MHDD 4.5. Double click the executable, which should have already downloaded (hey, it was in the requirements!) Will create a bootable floppy disk with the software.
is used version 4.5 because 4.6 does not have the ATA terminal that allows you to run scripts.
Created replacing the floppy fle Mhdd.zip with what will surely have downloaded. This file contains the scripts and other files needed to read the protected area.
It connects now the hard disk protected DIRECTLY to a port of P-ATA/S-ATA your motherboard. You can not use USB adapters, write blocker or other interfaces. MHDD bypasses the BIOS and go to read and write directly on the controller. The software works even if the disk is not seen by BIOS! The documentation of
MHDD:
Just look at this. This is a typical diagram how generic DOS program talks to the drive.
PROGRAM <---> MSDOS <---> <---> BIOS IDE / SATA Hard disk controller <--->
And now how MHDD works:
MHDD <---> IDE / SATA Hard disk controller <--->
It should then start the computer with the floppy preparation. If you look you will notice that is all'autoexec created a ramdrive that is the executable MHDD and all configuration files. It 's a thing to keep in mind, because the dump will be written on the ramdrive and then copied to the physical device A: I will not dwell too much
DOS commands. We do know that the mouse with this software is only useful as a paperweight. You must use the keypad to interact with MS-DOS. A Guide to DOS is beyond the scope of this document. Do not ask me how to copy a file. Treat you badly.

DOS commands. We do know that the mouse with this software is only useful as a paperweight. You must use the keypad to interact with MS-DOS. A Guide to DOS is beyond the scope of this document. Do not ask me how to copy a file. Treat you badly.

screen boot MHDD (I apologize, but the screenshots in DOS did not know how else do it)
With the command [SHIFT + F3] software scans the disk controller looking

The hard disk is blocked by ATA password and security level is set to HIGH
run the script with the command DUMP . dump (be careful to the point!)

I did not clear the meaning of the hex values \u200b\u200bto these lines regs, are considered specific for discs Western Digital and I are related to the offset needed to read a portion of the HPA that has kept the password. Surely you will find information on registers leafing the pages of the document 409 on the ATA spec ...
script generates two files and 21.bin 22.bin.
with the command EXIT we exit the program. The file is now on C: \\ MHDD. We copy it to the floppy and imported into a hex editor.
22.bin imported file in UltraEdit:

offsets may be different, but the sequence of bytes in the file is similar. At offset 0x137
the value 07 indicates the level of security assistance (in this case HIGH). Passwords are the two areas highlighted by 32 bytes. In red is highlighted the user password. In green the master password.
I select the two passwords and UltraEdit File -> Save Selection As saved me on a USB key both valuable password.
Now you can go back to using the mouse!
In locations where we have to unlock the hard disk we start Hiren's BootCD mode Mini Widnows XP (I used version 13) and insert the USB stick with the password file.
Mount Mount Removable Devices with USB on the desktop of Hiren's.
If you do not click on the icon just above the mount (Install all Hardware)
Hiren's menu to launch HBCD -> Hard Disk/Storage--> Victoria

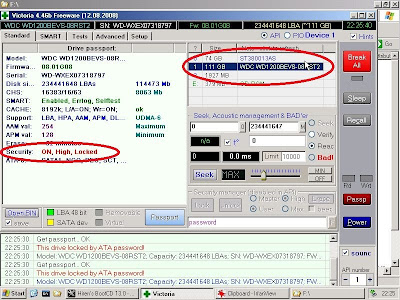
highlights which disk we are interested in and the software tells us it is (still) locked.
The Security section manager is not usable.
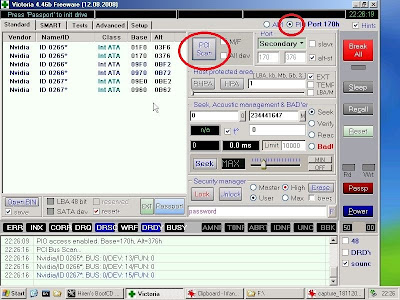
Victoria works in two modes: PIO and API. The ATA commands (such as those of lock / unlock) must be sent directly to the controller, without mediation or BIOS API. He then crossed PIO mode and click on PCI SCAN

And the doors appear PATA / SATA computer. A
which port is connected to our target disk?
If you click on each of those doors, down, turn on / off the PIO registers. Our record is certainly among those who have the flag DRDY (Drive ready) turned on.
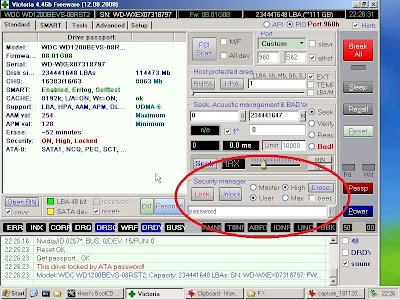
double click on the rows on the left appareil disk connected to that port.
In my case the disk is connected to the port identified by the 0960.

reappear information on the disc but this time the Security section manager is active. Finally we
. The album is being released ...

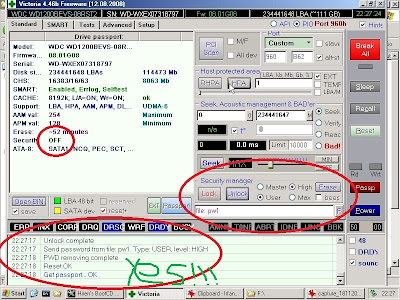
click on F , select the file with our user password (in my FW1 case), we verify that the radio buttons are set to User and High, click on Unlock and down the log file we will report the success of the operation!
If we now return in API mode the software will report the drive as locked. A hard switched mode API does not update the disk status. Just turn off the computer and the next reboot the drive will be unlocked.
I hope I have been of help to all the geeks, really curious, forensic experts, etc etc
My solution is not the best, nor one that I would recommend for the faint of heart. The programs used are EXTREMELY dangerous if not used carefully, you may find yourself with a blank disc or even unusable. I recommend it.
There are other solutions, such as dedicated hardware or sites carrying the release operation remotely. Google is your friend.
the next.
F.

0 comments:
Post a Comment